Pages
▼
Saturday, August 29, 2009
It's All About Will Power
My Last Bell Bottomed Bag?
I've seriously grown tired of making my bell bottomed bags. Just for variety, I wanted to make this one longer but I didn't have enough fabric. I've used most of my multi coloured fabric and there's only enough leftover for maybe one or two small pouches. Once again, I used continuous zippers. You simply can't go wrong.
Just look at the fat bottom. I added a pleat in the side gusset and it created a nice little dimple. Have I gone pleat crazy?
When I sell at the Red Dot Design Museum, I'm often asked if I have any plain solid colours bags stashed away. I can honestly say I can't make a plain solid colour bag to save my life. I'm a print, embroidery, quilting, multi colour fabric kind of girl. But I wanted to give it a go.
This is as plain solid as I can go. For now. As it is my first effort, I had to use a Japanese bamboo leaves print on the handle and inside band and pocket. Otherwise the plain solid beige would hurt my eyes.
I'm so sexy.
For this pleated tote, I went back to my lazy style of bag making. I start with a rectangular fabric and cut it down to size. If I had cut out a template on mahjong paper first, I would have saved a lot of time. Why don't I listen to myself?
See the curves on the tote? I discovered this round paper container cover makes a nice curve.
This is my current flexible curve. I love it. It's one of my most valuable tool. Previously I had an arthritic flexible curve which I bought from Daiso, a $2 shop. One day, I had to draw a rather challenging curve and the $2 ruler failed me. I shelled out serious cash for a better curve from Art Friend. I'm a "friend" so ther's a discount. I love being friends with retailers.
These bags will be available for sale at my "table" at the Red Dot Design Museum's MAAD from 5th to 6th Sept, 11am to 7pm. Admission is free.
Thursday, August 27, 2009
Pleated Shoulder Bag With Bands
I'm on a roll. Remember this bag I made last week? I made another one but this time I added a band above the pleats using my never ending multi colour fabric for my "Pleated Bags With Bands" collection? :D
My husband says the fabric looks so good I can't make anything ugly with it.
I wonder if it's even noticeable? I sewed the handles at an angle instead of the conventional straight grain to give it a sassiness.
Bands and pleats go so well together. I even put pleats in the side gusset.
A peek inside.
This bag will be on sale at the Red Dot Design Museum in Singapore from 5th to 6th September 2009.
Wednesday, August 26, 2009
Born Again
I have been to the dentist and after 1/2 hour of deep root cleaning or torture, I'm born again. Although I'm not completely healed yet, I feel 1000 times better. I shall spare you all the gruesome details. Just one thing. Am I the only adult to cry on the dentist chair? And this is while the dentist is working away.
With renewed energy, I've embarked on a series of bags of the same fabric. This is just a nice way of saying I don't want any left over fabric. The common thread is bands. Yes, I'm getting all worked up over bands. I'm putting it on every bag from now on. Okay, maybe just the next three.
I've always said I like my bags to be simple in structure. But from a construction point of view, my bags are hard to sew. For one thing, I usually use bottom gusset and I sew the zippers separately and attach them only when I join the outer and inner fabric. All that is a lot of work but I think the result is worth it.
Check out the curves.
A peek inside.
This bag is slated for sale at the Red Dot Design Museum in Singapore from 5th to 6th September 2009.
Monday, August 24, 2009
Dental Blues And Alien Eggs
Last week I ate something hard and sharp and it cut my gums near my molar. I told myself it would heal itself. of course it didn't. When it started to hurt, I made an appointment with the dentist. My regular dentist was only available tomorrow and I decided one more day couldn't hurt even though there was an earlier slot available with another dentist, I declined. I passed on the other dentist because she makes you feel more pain than is necessary. And she nags. And scolds. And I can't stand her. But right now, I'm starting to regret my decision. I was so wrong. One more day does hurt.
So I've been on a soft diet for the past few days. Porridge every day is making me really hungry.
I couldn't sew anything new. This bag I finished before the pain started. It's a nice fat bottomed bag and really roomy. The outer fabric is really beautiful. Doesn't the print remind you of the scene in Aliens when Sigourney Weaver sees thousands of alien eggs? No! It's really Sashiko like geometric figures.
Can you see the gold streaks on the print? I took this photo as the sun was setting.
Would you believe this is the first time I used magnetic snaps? Between magnetic snaps and hammered on snaps, the latter are easier to install. Magnetic snaps require layers of stabalizer but I like the look. However, they are rather expensive as I could only buy them by the piece at the craft shops.
I received more presents over the weekend. My sister, Elaine gave me a few craft books. They are in Chinese and Japanese. I don't read Japanese but I enjoy looking at the pictures. The bags in these books are too fussy for me to make. My style is simpler. But I love to see what other crafters make.
I'm making Elaine a bag. Her brief is simple. Something not too colourful and big enough to contain a handphone, wallet and a small umbrella. It's going to take a lot of will power for me to make something plain.
Wednesday, August 19, 2009
Pleated Shoulder Bag
This is a bag that I made backwards. First of all, I had an odd amount of fabric left which didn't qualify for scraps yet after making the recessed zipper shoulder bag. Most of the fabric was cross wise so I had to make a broad bag. So I thought a pleated bag would do the trick. It was! I even had enough for a nice bottom gusset. It was a little tough working backwards and I needed to work out the sums before I started cutting. Usually I just wing it. Certainly this experience has taught me that doing your sums before you start has its payoff. For one thing, with all that planning, there are no surprises. It's also more productive. And you can keep the measurements to make another bag.
I think pleats are so sexy.
Tuesday, August 18, 2009
I Felt Like The Birthday Girl
When my kids were in pre-school, they often looked forward to the birthdays of their classmates. This was because it was the culture for the birthday kid to treat the class to a party held in class. Without fail, every child would also be given a bag of goodies filled with candies, chocolates and small toys. I never really understood how they really felt until over the weekend, I attended the birthday celebration of my dear mom at a seafood restaurant in front of the beach.
I came away with gifts!
My sister Erica gave me a bunch of fabric. My goodness. Just look at them. I'm still smiling from ear to ear. I can't wait to use the fabric.
My mom gave me some vintage hankies.
This is a hanky with tatted edging.
These look like needlelace edgings. But I could be wrong.
My husband says it doesn't take much to make me happy. Just some cloth and hankies. Hope I don't get handkerchiefs for my next birthday! :)
Friday, August 14, 2009
Once There Was A Small Piece of Leftover Fabric
This bag started when I had some leftover fabric from making a bag for viv. I did not want to do another crazy quilted bag but I liked the idea of using the black gingham with the black and white print. I hand quilted little running stitches all over the black and white print. That was good. Then it went out of control. I added and added different fabric and in the end, I used 4 different kinds of fabric on this one little bag which grew into a giant. I had to buy more black gingham too as I had run out to make a decent length strap. You can't see the back but it's black and I hand quilted little running stitches like rain.
Now I have leftover black gingham and the lining which is a very nice grey which I specifically bought for this leech of a bag. What do other people do with their leftover fabric?
This bag's going to my September MAAD at the Red Dot Design Museum on 5th and 6th Sept.
Thursday, August 13, 2009
Help! My Corduroy Is Trying To Get Away From Me
I'm not very good when it comes to buying fabric. I usually learn my lesson the hard way. Take this corduroy I bought some time ago. I was looking for something retro and the print appealed to me. That I had never sewn corduroy didn't deter me. I didn't even buy just enough for one little bag. I bought enough for many little bags.
This was the first bag I made with the fabric. And I had to choose a really large bag to start with. Where do I begin? Cutting the fabric was just the start of the nightmare. Corduroy has ridges and the texture is slippery and lastly it has something called nap. (not associated with sleep)
Then try sewing. Corduroy runs away from you. And it keeps doing it again and again. There's no let up. It took me a long time before I completed the bag.
Memories of the nightmare finally faded and I thought I should try and use up more of the fabric. This time I chose a relatively easy bag to make. This is really a glorified drawstring pouch. I added the handles and now it's a bag. Fyi, the corduroy still tries to get away from me. I just sewed very, very slowly.
There's still some fabric left. I think I'll wait a couple of months. Sigh.
Wednesday, August 12, 2009
Giveaway
I've only entered for 2 giveaways since blogging was invented. I won neither. I'm not much of a winner in terms of lucky draws. This year when I entered for the 2 giveaways, I felt such a rush from the hope. Hope is such a powerful feeling. I felt alright even when I didn't win.
The lure of the giveaway is back! Meg's thread is doing a 100th post giveaway and I've entered for it. From Meg's blog I found another blog Little Diva which is doing a 113th post giveaway. So I entered for that too. Whew! Is there more out there?
My handles seem to be able to stand on their own. Amazing.
I made this bag to give away too. It's for someone I know. Shhh.
I had made a similar bag with the same fabric. That bag I had sold to an Australian visiting Singapore. Wendy, if you are reading this, a big hello to you. I'm such an optimist. I actually believe it when folks tell me they'll read my blog. Anyway, Wendy told me the fabric was gorgeous and so I went and bought some more. I'm such a sucker for compliments!
Monday, August 10, 2009
Peace Loving Shoulder Bag
Yesterday was Singapore's 44th National Day. Yes, Singapore is a young country. This year we did not hang the State flag because it was dirty and we were too cheap to get another one. Flag hanging in weeks before and after National Day is a national obsession here. Remembering to take down your flags is something some folks forget to do and months after National Day, there will always be a forgotten flag here and there and my kids and I make a game out of spotting one.
My bag has nothing to do with National Day. No, I'm not gonna make a red and white bag. (colours of Singapore's flag) But it's sort of relevant. So once again, I did a peace symbol applique. You would think I'd get over the peace symbol. I mean, I've used it over and over again. But no!
I had leftover green camouflage fabric. How much did I buy man?
I quilted the bag all over and it resulted in a thickness which is not home sewing machine friendly. I busted a few needles. I did the zipper in a new way. I left the ends unsewn but tucked into fabric tabs. They are then tucked in neatly into the bag. I used continuous zipper so it's not too hard to do. I imagine using a dress zipper would be tricky.
I've booked my slot for September MAAD (Market for Artists and Designers) at the Red Dot Design Museum. So this bag will be on sale there.
A lot of work went into this baby.
Sunday, August 9, 2009
Recessed Zipper Shoulder Bag Tutorial
Recessed Zipper Shoulder Bag |
This tutorial is provided free of charge. If you wish to acknowledge me in any way, just link to this post directly.
To use this tutorial successfully, you need to have basic knowledge of how a bag is sewn. This tutorial focuses on adding a recessed zipper to a bag. I have used more photos for the recessed zipper bit only. When it's not too difficult to figure out, I just have a "What you should get" photo. If there's anything I've missed out or if you spot any errors, please put in the comments and I will address them. Thanks. :D
My cut pieces
Note: backstitch all ends.
1. Cut the fabric
a) From pattern provided cut : 2 outer fabric & 2 lining
Get your pattern from my link below. You can download a copy to your computer or you can print without downloading; make sure "scaling is set to None" or "actual size" to print at 100%. HERE
Impt: Take the pieces you have cut and measure the top length. (the length which will match the band) Mine measures 10 1/2". If yours doesn't it's okay, just make the length of the band you're going to cut next match your length.
b) Band - 4 outer fabric (10 1/2" long (or whatever your length is) X 3" wide) Note: If you don't want the band to be so deep, just change the width to something smaller.
c) Please read step 6 before you cut the straps. Straps - 2 outer fabric (26" long X 2 3/4" wide)
2. Interface your pieces if you want to. As for me, my fabric is pretty thick and I don't like interfacing so I'm skipping it.
3. Sew tabs and the zipper to the band.
a) I'm using a 8" dress zipper. I usually use continuous zippers but I'm using a dress zipper here as I think most people would have access to one. If you've never tried continuous zippers, you should try it. It's much easier to sew. Only drawback is the colour available is rather limited.
b) Sew tabs to the end of the zipper. Take 2 small pieces of fabric. (avoid using thick fabric) Put the zipper end in between the 2 fabric right side together.
Sew on the wrong side of fabric close to the metal bits. I use a line to guide me so I don't sew on the metal bits of the zipper. Trim seam allowances.
Flip the fabric right side out. Topstitch. Repeat for other end of zipper.
Cut tabs to size. The length of the tabbed zipper should be about the length of the bands. Mine is just a little short but that's okay because of the seam allowances.
c)
Centre zipper on band and pin with zipper facing down and band right side up.
Sew zipper to band with 1/4" allowance using a zipper foot.
4a) Now's a good time for you to add labels/pockets to the lining if you want to.
b)
Centre band (with zip) on the lining with band right side down and lining right side up.
c)Sew lining to the band. You can use the seam line on the band as a guide.
This is what you should get
d) Repeat for the other side of the zipper to the band and lining
Pin another band to the unsewn side of the zipper with band right side down. See picture above.
Sew band to the zipper.
This is what you should get.
Sew other lining to the band and zipper you have just completed. Make sure the right side of the lining faces the wrong side of the zipper.
This is what you should get.
5)
Sew the side seams of the lining together using 3/8" allowance.
6) Before you sew the straps, make sure you know how to turn a tube inside out. If not, please use some other methods to sew the strap. You will then not follow my measurements for the strap.
Otherwise, carry on...
Fold the strap piece into 2 lengthwise. Iron.
Sew the raw edges lengthwise together using a 1/4" allowance.
Turn inside out. I use a large safety pin.
Iron and topstitch. Repeat for the other strap.
7)Sew the finished strap to the right side of the band 2" away from the side using 1/8" allowance from the edge of the band. 1/2" of my straps are "buried" in the seams but you can do what you like.
Sew the main outer fabric to the above matching the part of the band with the strap attached using 1/4" allowance.
Topstitch the seams. (on the wrong side, the seam allowances should all be facing down)
Topstitch the parts of the strap that crosses the band stopping about 3/4" away from top of the band.
I'm not too detailed for this step but by looking at the photo above you should be able to see clearly what I mean.
Do the same for the corresponding strap. Note: Make sure the length of this strap matches the length of the strap already sewn.
8)
Sew the side seams of the outer fabric together using 3/8" allowance.
9) Now's a good time to do something about the bottoms of the bag if you want to. For me, I'm doing darts. You can leave the bag flat if you like.
p.s. if you want to learn how to draw bag darts, please go to this post:
This is how I draw and sew a bag dart
Sew the bottom of the outer bag together using 3/8" allowance.
Seal up the darts if you are using any.
Do the same for the lining. But leave a gap for turning the bag out.
10.
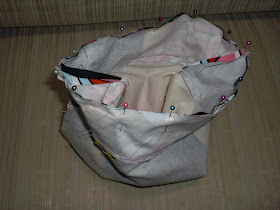
Match the outer bag with the lining right sides together. Pin along the band. Sew the top of the bands together using a 3/8" allowance. If 3/8" will cut into the strap, use a smaller seam allowance.
11. Turn bag right side out through the opening in the lining. Press. Topstitch the band. It's a little hard to topstitch around the corners. Alternative is to topstitch by hand or just leave it as it is.
12. Close the opening in the lining. And this is how a recessed zipper is done.
Have fun.:D
* * *
Below are my bag patterns which are available for sale at Etsy (instant download). Clicking on the images will take you to my Etsy shop.
For more Applique Resources
For more Tutorials