
Finally my long overdue Sarubobo's tute is up. Blogger had been giving me lots of problem and on top of that, I stupidly decided to make this a "photo tutorial" using Picasa.
What was I thinking? I already regret the decision. Firstly, Picasa allows you to upload 4 photos at a time to your blog. Secondly, the text I input to the photos are barely visible in some photos unless you click on the photo to zoom. So I have no choice but to go back and enlarge the text font. What an idiot right? So do click on the pics to get a clearer view of the text if it's not visible.
Enough griping. Just one last thing. My previous post was my 100th post and I forgot all about it. I had wanted to mark it the traditional "blogger way" by doing a contest or giveaway. I'll just have to mark another day chosen at random.
What are sarubobos?
First of all, I did not invent these babies. Go wiki to read up more. Second of all, I learnt to make these babies from a book I borrowed from the library. It's called Quiltagami by Mary Jo Hiney. She sews sarubobos a little differently from the method I'm using here but the end result is the same. The templates and instructions I'm providing here are mine.
Before I start, those of you who have aversion to handsewing, now's your chance to run for the hills.
1. The templates.
Please draw the following on hard paper.
Mama Sarubobo
Body: A rectangle 4" by 4 1/2"
Head: A circle with diameter = 2 3/4"
Toddler Sarubobo
Body : A rectangle 3" by 3 1/2"
Head : A circle with diameter = 2 1/2"
Infant Sarubobo
Body : A rectangle 2 1/2" by 3"
Head : A circle with diameter = 2"
Trace the templates on nice print fabric and cut.
Please note the templates is inclusive of seam allowance.
1.What you need:
bent-nose tweezer, fiberfill, cut fabric, scissors, drinking straw, needle and matching thread.

2. Folding the body. Work on the wrong side of fabric.


To go to the next step, make X meet Y
3. Handsew using 1/8" or 1/4" seam allowance. Whatever you choose, make it consistent. Take note you only sew thru' 2 pieces of fabric. Anything more you need to unpick.

To go to next step just move the position of fabric I have indicated in photo.


See the gap in photo above? That should be left unsewn.
4. Turn right side out using the straw trick. If you find this too difficult just use a tweezer to pluck the inner fabric out.


5. Fill body with fiberfill

6. Sew gap in body using whip stitch. (sew over and over)
If you use matching thread, your stitches won't stand out as much as mine.
7. Sew the head.


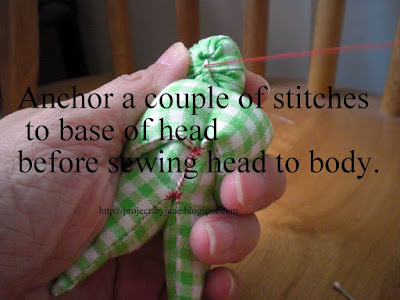
8. Sew head to body.
9. You may want to do this so you can hook the sarubobo to another object.
Sew 2 rounds of thread to head and knot off. Use a thicker thread.

or use a safety pin.
10. Pillar hat


If you want to add a sling to your hat, just sew 2 rounds of thick thread to the top of the hat and knot off.
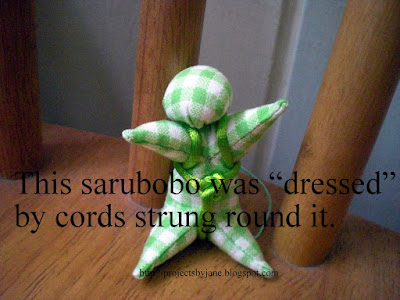
11. Dress up
I'm sure you can think up other ways to dress up the sarubobos.
* * *
Below are my bag patterns which are available for sale at Etsy (instant download). Clicking on the images will take you to my Etsy shop.
For more Applique Resources
For more Tutorials


2 comments:
Thank you so much for posting this! I've been away from blogging for awhile and I'm just now catching up. I will try my hand at a couple of these today.
Again - THANKS!
Cute!!!
Post a Comment