Thursday, June 5, 2014

Machine applique using zigzag stitch

One of the options for raw edge applique is to use a tight zigzag stitch to cover the raw edges. I must confess. It's not my favourite stitch. On my machine, I have a regular zigzag stitch and it looks like this:
If you want to be able to use your zigzag stitch well, you have to understand how the machine makes the stitch. On my machine, it starts with a locking stitch (the needle goes up and down a few times) before it makes a right stitch. Not every machine has locking stitch features so you need to try it out and see how yours work. So the zigzag stitch is pretty simple, the needle goes left and then goes right. Know that from R1 to L2, there will be a space depending on how long your stitch length is. Also know that L2 will never be perpendicular to R1. You need to remember this information especially when you are making stitches in difficult "terrain" like points or corners.

The look of your zigzag stitch can be adjusted to suit your liking. If your machine allows you to modify the stitch width and stitch length, you will be able to do the following:
- Stitch width changes the bite it takes
- Stitch length changes the space between each bite
On my Janome, I like to use these settings: width 3, length 0.5/0.4/1
I can't go any lower than a length of 0.4 as the stitches just get balled up. As a result my zigzags are not as close as satin stitch.

Speaking of satin stitch, if your machine has satin stitch, you'll need to check your manual to select the stitch and the recommended presser foot to use. Satin stitch should look much better than my zigzag stitch.

Next, lets talk about which foot to use. I should use the zigzag foot which is the default foot the machine comes in. But I don't. I have a satin foot which is used for decorative stitches. But I don't use it or the zigzag foot to sew zigzag stitches because the feet cover my stitches. That's why I use the open toe foot.

These are my "F" feet. (please excuse the dirty Ikea table top) The one on the left is my satin foot. The one on the right is my open toe foot.

Okay, I'm just going to talk about something that might be perculiar to me only. When my machine is set to zigzag stitch, the needle goes to the left position. This means my first stitch will be left. Logically, I would place my applique such that the LEFT needle goes into the background fabric right snug against the applique. (see image below) Right? If this is how you sew, I shall refer to you as a LEFTY.

But you know what? My brain feels very uncomfortable when I sew the applique this way (with the LEFT needle in the background fabric, snug against the applique).


Instead,I take a few test stitches and manually rotate the needle to be on the right when I sew on my applique. That way my RIGHT NEEDLE is the needle in the background fabric, snug against the applique. (I'm going to call myself a RIGHTY)

Beginnings and ends of threads
I don't back stitch and I bring the ends of thread to the back and knot off manually. I also like to begin stitching an applique at the least challenging position - something straight and definitely not at a point.

Things to consider
Thread: I use rayon embroidery thread and average weight thread for bobbin. Sometimes I just use regular sewing thread which I use for bags and clothes for top thread and bobbin.
Needle: I use embroidery needle size 75/11 or 90/14 for rayon and sharp needle size 80/12 for regular sewing thread.
Whatever thread you use, you need to match it to your needle.

Tension: Auto
If you need to adjust your tension, do refer to your machine manual.

Stabilizer : I always use stabilizer. If you don't have stabilizer, try with batting and interfacing. Never sew on one layer of fabric- puckering is bound to happen.

Needle down: Enable this feature. If not available, always rotate the needle to have the needle in the fabric when you stop sewing.

Inside and outside curves
You need to be able to tell the difference between an inside curve and an outside curve. See the shape below? What looks like a circle - that's the outside curve. The part that curves down (the curve in the middle) - that's the inside curve. To sew around curves, you will need to pivot from time to time and the position where you pivot for each kind of curve is different.


Needle position when pivoting for an outside curve
Needle should be in the background fabric only.
Needle down, lift presser foot, rotate applique slightly to the right (so the edge of applique aligns with the position of the right needle.

Needle position when pivoting for an inside curve
Needle should be in the applique
Needle down, lift presser foot, rotate applique slightly to the left (so the edge of applique aligns with the position of the right needle.


Outside and inside corners

Start anywhere except right at the corner. Here my stitch length is 1.0.
Sew like regular right up to the outside corner. It's better to go a little beyond the outside corner than before the corner. And by the way, since I'm a RIGHTY, the needle in the corner has to be in the RIGHT position. If you're a LEFTY, it will be in the LEFT POSITION.
The next stitch I make will go left. Now you see how it works?

Sew like regular.
Now we're coming to a inside corner. You want to sew beyond the corner by a couple of stitches.

You can pivot to see if your bite will be right at the edge of the applique. In this case, I'm a little short so I pivot back to the previous position and take another stitch. As I am a RIGHTY, I need my needle to be in the LEFT position before I pivot. For a LEFTY, you want it in the RIGHT position.
Yes, my bite will land my needle right at the edge of the applique.
Sew like regular.
End as close to your starting stitches as possible.

Time out: All these information might be overwhelming, LEFTY, RIGHTY, position of needle - for those of you who are new to zigzag stitching. But once you start trying it out, your brain will figure it out. The idea is to understand the techniques so that when things go wrong, you will have the ability to figure out why it went wrong.

From here on, I will only illustrate the stitches from a RIGHTY point of view. 

What happens when you use a tight zigzag and you don't want your stitches to overlap?

Here's how for outside corners:

 Sew right up to the end but end with needle on the left - i could have made 2 more stitches :( 
Anyhoo, notice after pivoting, my needle is in the left position? If I make a stitch it won't hit the applique at all.
Solution: Lift presser foot and manually rotate the needle until it goes right.
 Insert needle back where it came from. Presser foot down, continue sewing like regular.
The stitches do not overlap. (remember the extra bits of applique I missed? just cut off the bits)

Here's how if you don't want your stitches to overlap for inside corners:
 Stitch right up to the corner but end with your needle in the left position.
 Pivot. Notice your needle position is left but you want it on the right.
No worries. Presser foot up, manually rotate your needle till it goes right. Insert your needle right back where it came from.
 Sew like regular.
No overlap.

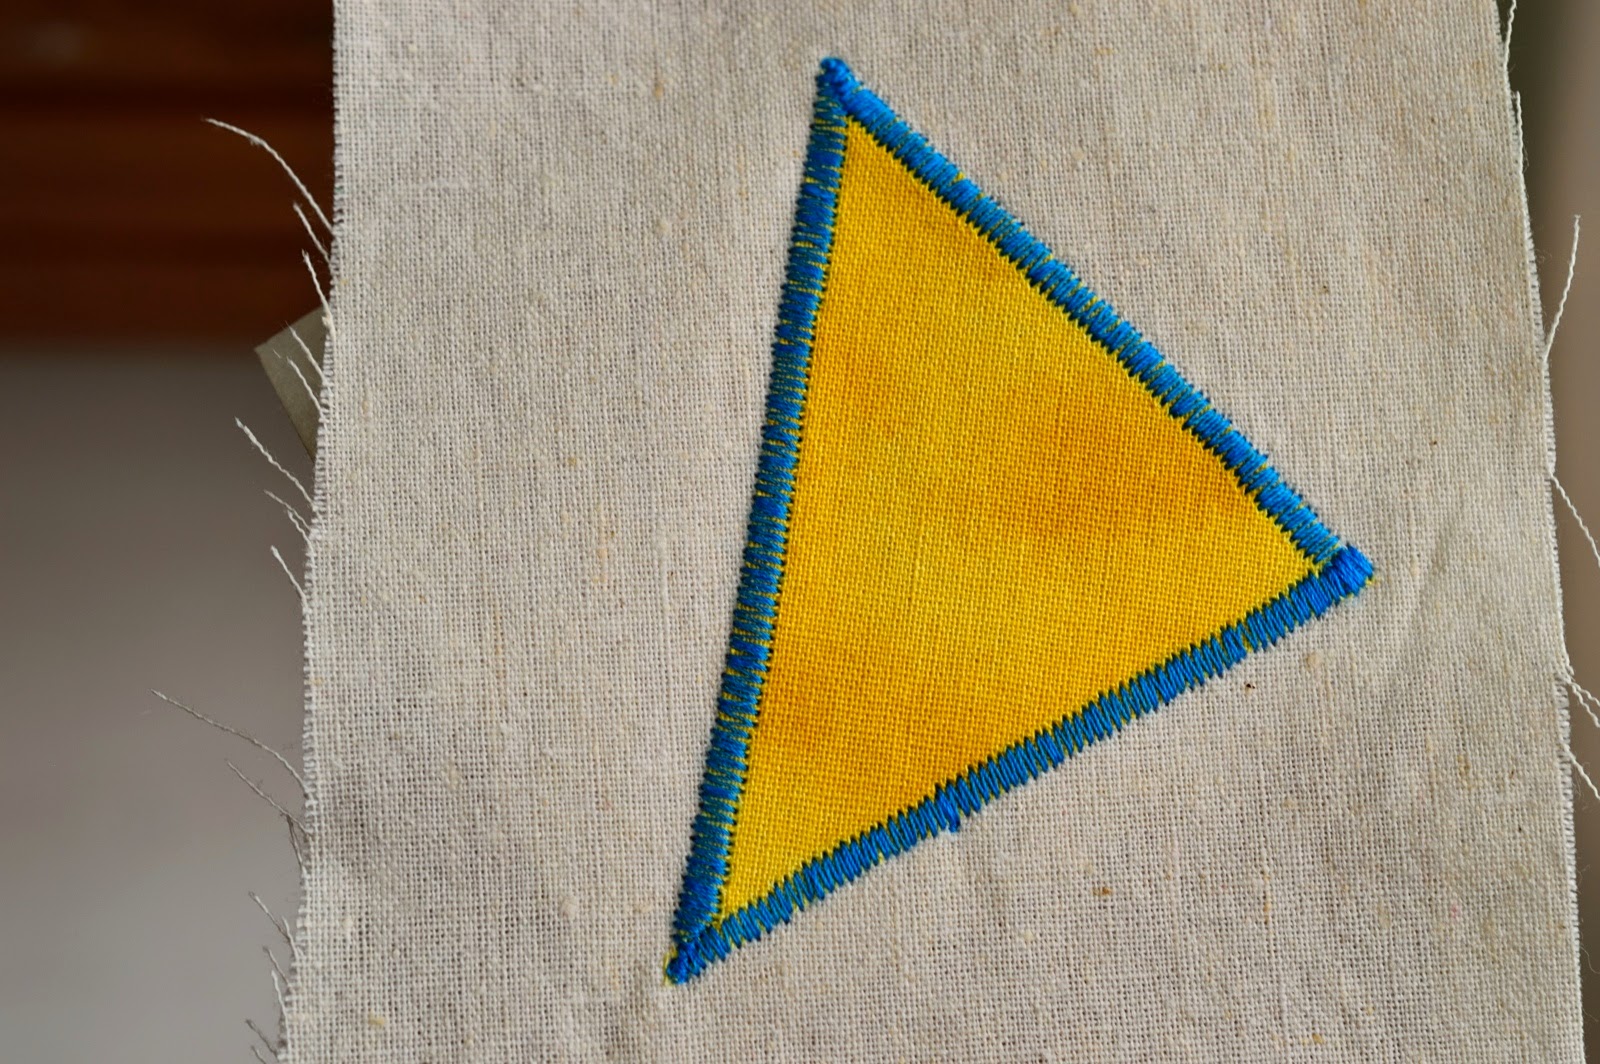
Points are the hardest to sew. Use the following method for narrow points. If your points are fat enough, you can use the method used in corners.


 Start anywhere except at the point.
As you get closer to the tip, you reduce the stitch width. (the bite) The idea is to keep your stitches as close to the applique edge as possible. Here I reduce from 3 to 2.5.
 I reduce to 2 for the next 2 stitches and finally when I hit the tip, I am at 1.5 and I end with my needle on the right. (on my machine 1.5 is the lowest I go but you can try on yours and see what works for you)
 I pivot and have my right needle lined up with the edge of the applique.
You must keep your eye on the right needle as you want it snug against the applique. As you move away from the tip, increase your stitch width (1.5 to 2, then 2.5 and finally 3 which is the stitch width I'm using)
  If you are using a tighter zigzag stitch, the method is the same.

Before you start sewing on your applique, take a look at the shape - is it a curve, outside curve, inside curve, inside corner, etc. This helps you figure out how to sew. Lets take a heart for instance. It's mostly outside curve and the tip of the heart - you can take care of it like how you take care of a outside curve. But if the tip of the heart is really, really pointy, then use the method for the triangle. The other "tricky" part of the heart is the valley but it's really an inside corner.

Hope this long tute is helpful to beginners new to zigzag stitch.

**********************************************************************
Bag patterns at my Etsy shop
https://www.etsy.com/shop/projectsbyjane?section_id=10068875&ref=shopsection_leftnav_1

Applique patterns at my Etsy shop
https://www.etsy.com/shop/projectsbyjane?section_id=15580078&ref=shopsection_leftnav_2

For more Applique Resources
For more Tutorials

Friday, May 30, 2014

Machine Applique using Blanket Stitch

Machine blanket stitch can be used on turned applique as well as raw edge applique. (For fusing raw edge applique tutorial, please go here) If you’ve never done machine blanket stitch I hope this post will help you get started.

p.s. if you own one of those sewing machines that has built in functions specifically for applique such as cornering, pivoting, you should refer to your own machine instructions on how to use them.

What you need
An open toe foot (if you are sewing through several layers, you can also use a walking foot)
Blanket stitch on your sewing machine (I use a Janome)
(Note that on my machine, my default setting is needle down - this means when the machine stops sewing, the needle position is always down)

1
Learn how your blanket stitch is sewn on your machine. Refer to your sewing machine manual to select the blanket stitch option.

Next try out the stitch on some scraps. Observe how the stitches are formed and figure out what the repeat pattern of stitches is.

On some machines, it’s one forward stitch, left stitch, right stitch and this is one repeat. We'll call it Scenario A.

On my machine, it’s one forward stitch, one stitch back and a second forward stitch (that’s 3 straight stitches), left stitch, right stitch to make one repeat. We'll call it Scenario B.
One other thing my machine has is it starts with a locking stitch - up/down on same position a few times. My machine also remembers where it left off and will continue the blanket stitch unless I do a reset.

2
If your machine allows you to change the size of the stitch, you should try different variations and see which one appeals to you.

If you change the width of the stitch, you are only changing the stitch that goes left and right. If you change the length of the stitch, you are only changing the stitch that goes forward/backward.
I start with the default settings and then reduce the width (zigzag). On my machine, my default length is 2.5 and can only be adjusted down and not up. 2.5 to me is pretty short so I stick with it. I find that I like my stitches to be 2 to 2.5 for width and 2.5 for length.

3
Here I will tell you a few things I do which you don't necessarily have to follow but they work for me.

Thread: I use average weight thread, meaning the same thread I use for sewing bags, clothes - I use it for my applique as my top thread and bobbin thread. I always use the same thread for top and bobbin, including using the same colour. Some people use a special bobbin thread. Some people use fine thread for top thread. Some use thicker thread for top thread. These are all personal preferences. What's important is you use the right needle for the kind of thread you are using.

When it comes to colour of thread, I want it to show and I go for black or something contrasting. If you want your stitches to blend in, then match them to the colour of your applique instead of the background.

Needle: I use 80/12 sharp needles which suit average weight thread.

Tension setting: I use Auto.

Stabilizer: I usually use stabilizer because I only have the applique over one layer of fabric. When I don't use stabilizer, I see some puckering. If you are sewing through several layers (like a quilt), a stabilizer might not be necessary. You need to try it out and see.

Speed: I sew slowly.

4
Beginnings and ends of thread
- you could bring the bobbin thread up (needle up and needle down will bring it up so you can keep it out of the way) or you could leave the bobbin thread as per normal as long as you keep it out of the way

- when you are finished with stitching around one motif, leave some thread

- from the back, pull whatever front thread you can to the back

- whatever thread left in front which you can't pull to the back, thread it into a needle and bring it to the back

- from the back, knot off the threads and cut

5
Where to start the first stitch?
Generally, I would choose to start where I could hide that it's my starting point. If the applique has no sharp points or corners, I would start on the straightest or least curvy path. If I have corners, like a square/rectangle or a leaf with pointy ends, I like to start right at the tip. Once you have sewn a number of appliques, you will have your own preferences on where to start.

6
This is how your needle is positioned when sewing a blanket stitch. Notice that only the left/right stitch pierce the applique. The forward/back stitch lie on the perimeter of the applique.

Why do you pivot and when do you pivot?
When the edge of your applique is a straight line, you won't need to pivot until you reach a corner or until it's no longer a straight line. For applique with curved lines, you need to pivot a lot. The general principle is we always want the forward/back stitch to lie right next to the raw edge of the applique. When the needle takes a stitch forward or backward, it does it in a straight line. So the goal is to align the edge of our applique such that the next forward stitch sits next to the raw edge.

For me, the best position to pivot for curves is right after you have completed the right stitch and your needle is right snug against the edge of the applique. (see image below)
In the image above, you can see clearly that if I didn't pivot the applique, my next forward stitch will not be snug against the edge of the applique and we don't want that.
In the image above, I did a pivot (needle down, presser foot up, shift applique slightly to the right) Now I'm confident my next forward stitch will lie snug against the edge of the applique.

7
Practice on an applique that looks like this. There isn't much difference between sewing on the outside curve and the inside curve. Sew slowly. Each time you finish with the right stitch, see if your next forward stitch will lie snug against the raw edge of the applique. Pivot to line up. When you reach where you started your blanket stitch, end with the right stitch.

8
Below I have captured how I handle the corners of a simple rectangle/square. Some people may handle the square corners differently but for me, this way works every time consistently.
At step 5 (in above image), I "hid" my left and right stitches by sewing over the previous stitch (which lie snug against the applique). You will notice that at each of my 4 corners, I will have one stitch being crossed.

9
Below I have captured how I sew blanket stitch on a leaf with 2 pointy ends.

Although in step 6 (in above image), I manually moved my needle up to re-position my applique, I'd like to caution you that if you move your needle up too much you could end up using one stitch. So if you think your next stitch is a forward stitch, it could end up being a left stitch. On my machine, if the next stitch is a left stitch, if I manually move my needle up, it will just go left so I can't manually move my needle until the next stitch is a forward stitch. Another thing which might happen if you mess with the needle position is if you pull up too much bobbin thread in the process, you could end up jamming your machine. You really need to try it out and see for yourself.


10
Below I have captured how I sew blanket stitch on a heart. In case it's not obvious enough, in the image below, in step 3, after you pivot, you need to make one stitch.

Although a heart has a pointed tip, I did not start at the tip as it is a bit fatter and has room for me to stitch on instead of hiding the left/right stitch like how I did for the leaf.


11
Before you start sewing on an applique, you want to take a look at the shape and decide where you want to start and the tricky areas you need to pay attention to. If I were to applique a star, I can see that the tip of the stars is a good place to start as it's almost like my leaf except with straight lines. The star has inside corners like the heart and I would use the same method. I would end the same way I end the leaf.

I hope this is helpful to some of you.

**********************************************************************
Bag patterns at my Etsy shop
https://www.etsy.com/shop/projectsbyjane?section_id=10068875&ref=shopsection_leftnav_1

Applique patterns at my Etsy shop
https://www.etsy.com/shop/projectsbyjane?section_id=15580078&ref=shopsection_leftnav_2

For more Applique Resources
For more Tutorials
Related Posts with Thumbnails

My Bag Pattern Shop

https://www.etsy.com/shop/projectsbyjane

My Applique Patterns

https://www.etsy.com/shop/projectsbyjane?section_id=15580078&ref=shopsection_leftnav_2

My Embroidery Patterns

https://www.etsy.com/shop/projectsbyjane?section_id=15580078&ref=shopsection_leftnav_2