
When I wanted to make a perfectly lined zippered boxy pouch without ugly raw seams or hiding of raw seams via bias binding, I couldn't find any tutorial in googleland. So I used what I learnt at Thimble and a bit from Three Bears and I managed to achieve my dream pouch. A reader named Grace wanted to make one too and I found it too hard to explain so I decided to come up with a tutorial instead.
To achieve a crispier boxy pouch, you can use interface but for this tutorial I'm skipping the interface.
Here's what you need:
Outer fabric (camouflage) 2 pieces 10" by 6"
Lining 2 pieces 10" by 6"
8" zipper
Handle (camouflage) 1 piece 10" by 2" (lengthen if your hand is large)
Oops. I forgot to include the handle in the photo.

Note: For outer fabric, I prefer to use 2 pieces of fabric instead of 1 as I find it easier to topstitch around the zipper. If you use 1 piece of fabric just skip sewing up the bottom.
Here we go.
1. First I like to sew the ends of the zipper together. It's much neater.
Next let's create sandwich A by lining your fabric in this order matching long edges:
Outer fabric right side up
Zipper wrong side up(Head of zipper is on the left)
Lining wrong side up
Baste or pin
There will be 1" seam allowance on either side of the zipper. I like large seams when I work with zipper. If you prefer 1/2" seam allowance, just modify the length of the fabric from 10" to 9".
Mark on lining the 2 positions of the end stopper of the zipper. (the metal bits)
The picture below is to give you a better idea of the positions. It's not part of this project.

On the lining I have marked 2 red lines

2. Now check the order of sandwich A. Make sure you got it right. Trust me. I've been there. Now use a zipper foot and sew sandwich A BETWEEN the 2 marked positions on the lining.

3. This is important. Flip sandwich A right side out.
Make sandwich B in this order matching long edges:
Other Lining right side up
Sandwich A with right side of zipper facing up. (zipper head is on the left) You should match the zipper with the long edge of the other lining.
Other Outer fabric wrong side up
Baste or pin
Mark on outer fabric the 2 positions of the end stopper of the zipper. (the metal bits)

4. Use a zipper foot and sew sandwich B BETWEEN the 2 marked positions on the outer fabric.
Flip until right side out and press.
Topstitch on outer fabric BETWEEN the metal bits only.

5. At this point, let's do the handle. Fold the fabric for the handle like a bias tape - half and half again. Sew along long edges.

6. Flip until the outer fabric are right side together and the lining are right side together. Match edges and pin. Sew the BOTTOM of the outer fabric and the BOTTOM of the lining. (see where I have pinned?) I used a 3/8" allowance. (you can use any seam allowance for sewing the bottoms) Remember to leave a gap on the lining for turning right side out later.

7. Flip around until the bottoms of the lining (you have just sewn) is in the centre while on the other side the zipper is in the centre of the outer fabric. Be as accurate as possible or your pouch will be lopsided. Press, press, press.

8. Find the side of the outer fabric where the end of the zipper is. Mark a line across the side seam with the line as close to the last stitch on the lining as possible. Lifting the lining out of the way, sew on the marked line. You will sew over the zipper ends but you SHOULD NOT sew onto the lining. (the picture is pretty clear)

9. Insert the handle with raw seams pointing out aligned with the side seams of the outer fabric where the head of the zipper is. Match edges and sew as in step 8 and once again lift the lining out of the way and sew only on the outer fabric side seam.(and over the zipper as well) Reinforce the handles.
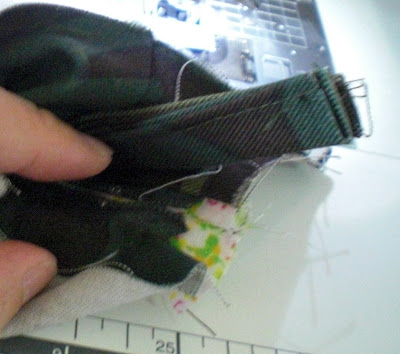
10. Unzip the zipper now or you'll be trapped. Sew the side seams of the lining once again sewing as close to the last stitch of the outer fabric as possible. DO NOT sew on the outer fabric or the zipper. You will notice there is gap in the lining where the zipper is. Don't worry about it. It won't matter once the bag is turned right side out.
The next picture shows the desired result. The outer fabric and lining have separate side seams.

11. Trim seam allowances. It's time to do the boxy bits. Yay! Manipulate the 4 corners of the outer fabric and the lining to form triangles. Use a ruler for accuracy. Pressing, press, press. You can use any measurement for the triangles but they must be accurate and consistent.

12. Mark the positions and sew


13. Trim.

14. Turn right side out through gap in the lining.

15. Use chopstick to straighten the pouch through the gap in the lining.

16. Handsew the gap in the lining, add a zipper pull and you're all set.

17. No raw seams.

* * *
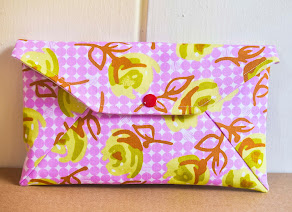
Below are my bag patterns which are available for sale at Etsy (instant download). Clicking on the images will take you to my Etsy shop.
For more Applique Resources
For more Tutorials













39 comments:
Hi Jane,
Thanks for this!
I've been wanting to try your previous suggestion of combining tutorials, but it just didn't happen, haha.
This is very clear, can't wait to try it out! :)
hiya kookietookie
i'd love to see what u make. be sure to send me a pic.
I was looking for a tutorial like this one for weeks! I love it! I immediately made a much smaller bag out of silk, which proved to make boxing the corners more difficult, but well worth it. Thank you!
- MaLora
Hey MaLora. I can't imagine making boxy corners out of silk! You must have magic hands. All the best on your 101 things to do. :)
I can't believe I didn't take any photos before I gave the back to my future mother-in-law... but I used some stiff iron on interfacing to secure the easily frayed ends and give it structure. I also hand sewed down the lining to the zipper before reversing the bag, it helped give it a finished look internally. Thank you for the fantastic tutorial!
Love it putting it on my blog today :-) thanks!
What a great tutorial. Will put it on my crafy news blog today.
Hello Jane - thank you so much for tutorial; it worked brilliantly, and you can see my result on http://www.flickr.com/photos/notyetthedodo/3705060678/ - I will make more and develop the concept, I think! Thanks for sharing!
Hi NotYetTheDodo
I noted fr ur flickr that ur lining was larger? Try sewing the seams for lining 1/8" more than for the outer. (except for the zipper seams) Btw, your pouch looks great!
Jane
Great tutorial. Although it did take me an age to work out the boxed seams, but seemed (lol) easy once I worked it out. I've added mine to the flickr pool. I'm a beginner at this sewing lark so I just used what I had to hand to see if I could actually do it. Definitely going to make some more now i know i can
Hi Jane. I am a Family and Consumer Science teacher and have recently given my advanced class a challenge to use old jeans to make something new. I am going to show them your website and hope some of them will use your tutorials to make their project. I am also obsessed with making bags (and pincushions) of all kinds and I am so glad to find your site.
-karen j
karen, oh how sweet. love to see what the kids make.
Thank you so much for this fabulous tutorial! It was exactly what I was hoping to find. I plan to make a few for Christmas gifts. Thanks so much!
Thanks alot for the tute...it's really easy to follow with lots of pictures..in fact I just did mine. Please check it out at http://chez-vies.blogspot.com/2009/12/pink-flowers-zip-pouches.html
Warm regards
This is just perfect :) thanks for the tuto...I've linked yours to my blog, hope you don't mind :D
Thanks for posting this tutorial! I just made one for my husband. I posted a picture of it here: http://sitasewing.blogspot.com/
Thank you so much for this tutorial!
You've just solved my problems for the beginning of classes :)
It's so well explained.
Valeria
I've made a bunch of these for myself, but keep giving them away to friends and my daughters who just love them! This is the best way to put these together that I've come across. Great job!
I've been looking everywhere for a tutorial like this one - with the lining! :o) Thank you!
And I must say I love your blog! It gives me inspiration for my own projects :o) I especially like the fact that you also post some projects that didn't turn out the way you wanted them to. So I'm learning by reading your posts, instead of learning by doing. ;o)
Thanks for the tutorial. I managed to make an almost perfect pouch. Now, I will make some more with interfacing to give it more weight. They will be given away at my niece's 7th birthday party. Again, thank you very much.
Thanks so much, Jane! I just tried my first boxy pouch tutorial and ended up with the raw seams, which I really don't like. I'm so glad to see your tutorial with no raw seams. Thanks so much for saving me the time of figuring it out myself!! ~Corinne of Bagalicious
I just made two of these the other day. One big and one small one. I already got to use the big one on our 2-day trip. It sure holds all of my things like lotions, perfumes, etc. :) Lovely!
That is brilliant, Jane! I've tried sewing before... and it was a complete disaster and you make it look so easy! Thanks for sharing :-) Shirley
I'm clueless when it comes to jewelry making Shirley!
I love these bags. Will make 2 for Christmas for my son(in the military) and my husband(who wishes he had been).
Thank you thank you! I have just made my first of these and it is fantastic, what a great tutorial! I will add a picture to your flickr pool :)
Ali
x
Thanks so much for your wonderful tutorial and for answering my questions! I had so much fun making my pouch today, it turned out perfect!
i've been searching for this tutorial for AGES. i hate the boxy pouches with exposed seams. oh, thank you. thank you.
Thanks, this was an excellent tutorial :) Now I just need to make a bigger one, wasn't really quite clear on the size and it came out a bit tiny. Wonderful!
Hello Jane, thank you for your blog. So far, I've only done the pouch, but I have a question. When you do the boxy corners are you meant to do them 8 times in total? Outer fabric and lining separately? Thank you so much.
@Anonymous
Yes you need to do the boxy corners 8 times in total. Outer fabric & lining separately.
Hi there! I used your tutorial to make a small zippered bag and posted a blog about it here: craftycamolover.blogspot.com/2011/07/lovely-set-for-knittercrocheter.html
Thank you for the tutorial! I had never done anything like this before and it was very helpful! :)
Thanks for the tutorial! You can see my finished bag at http://linnea-joyfulstrength.blogspot.com/2011/07/boxy-bag.html . I think I'll make the lining even smaller next time, though! Thanks, again.
Thank you so much. I made one, slightly bigger and found the tutorial wonderful and so nicely written. Now when I press my seams I always say "press, press press", and probably do it better. It's blogged here: http://sharondoubleknit.blogspot.com/2011/09/getting-ready-for-funnest-month-of-year.html
Thanks for the tutorial...the picture made it so much easier to follow..
Genius!!! Thank you so much. I hate raw seams, and I don't like using bias. This is perfect.
I'm sort of bad with math, and I think I need to make a bigger bag (needs to fit two full size shampoo things and maybe some kind of scrubbie). How can I figure out what size to cut my fabric pieces, if I know the dimensions I'd like the bag to be?
@Ashley, use newspaper to do a mock-up and use that to figure out the dimensions of the pattern. Just remember to add seam allowance to every seam.
Thank you so much for putting together a tutorial without the raw seams! I'm just starting to look for Christmas gifts but didn't like the way the raw seams looked and was trying to figure out if I could determine how to get rid of myself... your website makes it much easier!! Can't wait to make these! Thanks again!!
Post a Comment