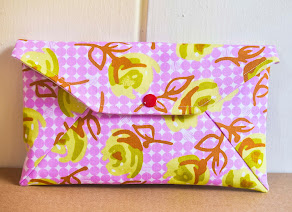
I am a genius. When I couldn't find any tutorial which could give me a perfectly lined boxy zippered pouch without any exposed raw seams, I decided to combine 2 tutorials.
I went back to Front Zippered Pouch Quest No. 4, followed the Thimble tutorial and to take care of the boxy bit, I followed Three Bears tutorial.
And I did it. I got my perfectly lined boxy zippered pouch. Whoo hoo. Yay. Mission accomplished.
And that's the last time I'll ever try this stunt again. It was hard. I can't even begin to describe how awkward it was to sew the boxy seams on a front zippered pouch. I felt I had 10 extra fingers in the way.
I used a cotton fabric a friend had bought me from Kelantan, Malaysia. Okay, she asked me what I wanted and I told her fabric. I think people I know are now afraid to ask me if I wanted anything from abroad because they know I'll ask for fabric. Buying fabric is hard. I know because many times I've gone to Spotlight and come out empty-handed. One reason why I love to watch Project Runway is to see the designers buy fabric. Crazy but true.
Back to the fabulous cotton from Kelantan. I had a little trouble finding a lining to match it and eventually used a purple from my hoard of solids which I had refused to use for the longest time.
Beautiful. No raw seams anywhere.
Monday, September 29, 2008
Friday, September 19, 2008
I'm In Love or Boxy Zippered Pouch Quest No. 2
Not long ago, I went down to Clementi to visit my sewing machine dealer. She introduced the adjustable zipper foot to me. Since I was sewing so many zippered pouches, I was getting rather impatient with the zipper foot that came with my sewing machine. It just couldn't get as close to the zipper as I wanted.
When Helen, the dealer whipped out this magic foot which could go where no ordinary zipper foot could, I was sold. (I'm easily sold by the word 'magic') I flew home. I couldn't wait to zip awaay. My head was filled with images of all the zippered pouches I was going to sew. Me and my adjustable zipper foot were going to be inseparable. I was in love.
Here's the funny part. When I reached home, I spent hours just trying to screw the adjustable zipper on the presser bar. I simply couldn't get it to fit. I was so frustated. I went to Googleland and tried to find a tutorial or something. I could barely find an image of the zipper foot I had bought. I started to curse Helen. Doubts started to set in. Could my beloved Helen have sold me a fake? I decided to storm down to Clementi the next day.
Next morning, very funny story. I sat down at the sewing machine, looked at the darn adjustable zipper for the longest time and realised I had been holding it upside down! It's true. I'm so dumb. I screwed on the zipper foot no trouble this time and I am still in love. I feel like 19 all over again.
The zipper on the right is the adjustable zipper foot. It does piping too but I haven't figured it out yet.
My last zippered pouch was an unlined boxy pouch. I wanted to try out a lined boxy stationery case using Dragoknitfly tutorial. Construction wise it's similar to Three Bears except it's lined.
This stationery case is for me.
My trusted mechanical pencil.
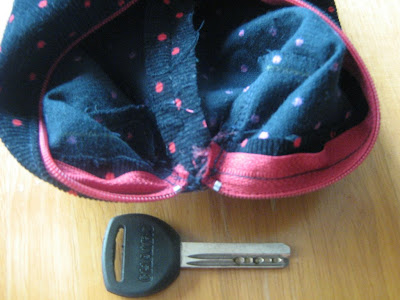
Boo hoo. Raw edges.
Monday, September 15, 2008
Boxy Zippered Pouch Quest No. 1
After making every kind of zippered pouch possible, I was asking myself, "what next?" I had read rave reviews of a little boxy pouch by Three Bears but had hesitated trying it as "boxy" was a little intidimating. I studied woodwork in Secondary 1 and 2 and had rather unflattering review from the teacher. "Couldn't plane to save my life." "Saw like a girl." You get the idea. So boxy kind of brought back scary memories of Sir screeching, "Observe, observe!" Why didn't I opt for Home Economics?
Boxy pouch turned out to be pretty easy to make. It's done like a regular top zippered pouch. Pay attention to the details or you'll end up with a regular top zippered pouch like what happened to me the first time. Heh heh. The magic is in the corners. A seam here and a seam there and tada! A boxy pouch emerges. My only grouse: it's unlined!!!!!
Even without any interfacing, the boxy pouch could retain its boxiness
Unlined!
Wednesday, September 10, 2008
Oriental Charms
Finally I get my camera back from my mother-in-law. All of August I was glued to the TV watching Beijing 2008 Summer Olympics, mostly table-tennis. Singapore won its first medal (Silver for Table-tennis) in 48 years! Yeah! I'm very happy to report that 48 years ago I was not even born yet.
I was very into table-tennis growing up. In primary school, I joined the school team but didn't even get to hold the bat. In secondary school, I joined the school team and finally got to hold a bat only to end up as a sparring partner and ball retriever. So I did what any table-tennis loving gal would do. I joined the queue at the void deck where a forward thinking government officer had installed a table-tennis table to keep kids in my neighbourhood out of trouble. Everyday during the school holidays, there would be a game going on. Void deck table-tennis is tough. Only the winner gets to continue playing - usually some tough boy who could spin, underspin, chop with superhuman reflexes. You only get to play 5 balls with the ping-pong king. When he wins, he'll shout out, "Next better player!" It's humiliating but that's how I picked up table-tennis.
During the long, very long and exciting matches between Singapore and South Korean and finally China (over in a split second), I was so hopped up I actually saw myself playing along with every move, spin, stretch. I was The One. I could slow-mo a ball, leap in the air, smash a ball through the opponent. Funnily, in my fantasy, I always see myself playing FOR China.
Now I play table-tennis with my husband on our dining table. We use a toy bus as a net.
So, to commemorate something Oriental although it's a bit late, I did some charms which I picked up from this book Decorative Knot Craft by Kim Sang Lan. The instructions for the knotting in this book is incredibly hard to follow. I've only managed to figure out Ginger Knot and Ring Knot. I have the idea of using these charms as either pouch charms or just as a simple zipper puller.
One new thing I'm doing with my pictures is all my pictures will have an everyday item so one can tell how big it is since I never bother to mention the dimensions. My husband suggested it to me and I thought it would be fun.
The red ball is the Ring Knot. The rest are Ginger Knot.
What's interesting about two ring knots is you can make the length of the braid change by moving the ring knots. Amazing!
Small (Note the distance between the 2 ring knots and the length of the braid)
Big (The ring knots are close together while the braid has lengthened)
Ring Knots as zipper puller
Subscribe to:
Posts (Atom)