Well, I have. Because I have 3 online free tutorials which link to PDFs.
First of all, you need a internet space to store your file. Then you need to make it public and the linking is the easy part. The hard part is finding a internet space to store your file. Because you don't want to have to pay for the space. You want it FREE.
Back in the days, I used scribd. It was free. Then one day it started asking for money. So I moved my files to Acrobat workspace which was free as well.
One day I discovered google is very generous with internet space. It's called Google Drive. No, don't look out of your window. It's in the internet! It's in the internet! Okay, if you want, it's in your monitor. So when I created my Doggie Embroidery Floss Keeper, I put the PDF in my google drive. And it's not very hard to do either.
Anyhoo, this morning I received a email from Adobe that my free Acrobat workspace will eventually be taken back and I have some time to find an alternative space for my files. (I only have 2 PDFs residing on Acrobat workspace)
So I'm moving my files, right? And I thought why not write a tute while I'm at it. I know it works for Blogger as I use Blogger. So here goes.
Edit 22th March 2016 p.s. I have updated the following steps and photos as the interface has changed a lot since I wrote this post in 2014.
1. You must have a file to upload first.
2. If you're on Blogger, you already have a Gmail or Google account. Go to https://drive.google.com
Sign in if you haven't already.
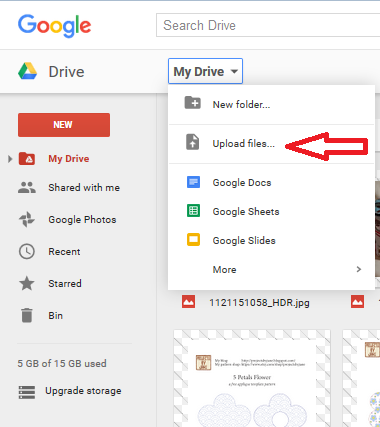
3. To upload your file. See My Drive? Click and select "Upload files..."
4. Go to correct folder where your file resides and select file.

5. A upload wizard appears on right hand side. See image below. When upload is complete, click on pdf and it will open.

6. Within the pdf, you will see this symbol which looks like a person+. Click on it.

7. Click "Advanced" to get more options.

8. Click "Change" to modify access. Note that at this point, this pdf is "Private - Only you can access".

9. Select the access you desire. Mine is a free tute so I choose "Public on the web". If I want to restrict it to only people I share the link with, then I would choose "Anyone with the link". Click Save.

10. Clicking Save on previous screen will take you back to this screen below. Here is where you can grab the link (just click on the link and right click copy) you need to put in your blog post. Notice you can also share on gmail, Google+, facebook and twitter. Note the access has changed to "Public on the web - Anyone on the Internet can find and view." (because this was what I selected)

11. If you don't know how to link to the file in a blog post, here's a quick how-to. The screen below is your Blogger editor.

Is that easy?
Hope my instructions are clear.
Edited 8th September 2016
Zeedon Briggs asks for the pdf to be embedded in a blogger post. Is that possible? Yes.
First, let's assume you have already done all the access changes needed. Next open the pdf in your google drive. The codes you need is hidden so you need to do the following. First click on the 3 vertical dots. Next click on "open in new window. (see image below)

You will get the same pdf opened in a new window like below. In this newly opened pdf, click on the 3 vertical dots again and this time you will see the option "Embed item...". Click on that.

You should get the next screen. Copy the code and paste it in the HTML editor in blogger. If you put in COMPOSE editor it won't work.


Hope this helps.


43 comments:
Good grief, that all sound too complicated!
You are so much more computer savvy than me Jane.
Thank you for the great tutorial, Jane! I've wondered how this is done.
Thanks! That has literally saved me hours - what a great set of instructions.
My cot mobile tutorial with pdf templates will be up as soon as I have finished making it! Thanks.
http://playathometeacher.blogspot.co.uk/
Thanks for this! Really useful and simple to follow, you've just solved my blog problem in a couple of minutes! :-)
I LOVE YOU SOOO MUCH FOR SHOWING THIS TUTORIAL!!!!!
IT HELPED ME OUT GREATLY!!! You can't even imagine, or maybe you could...I don't know, but I spent hours trying to understand pdf linking, and watching videos and NOTHING HELPED ME! >.<
But this tutorial was just....ahhhhhh...GREAT! I really loved how you introduced a new way to linking a pdf into blogger, thank you so much!!! I hope you get to see my comment. ^^
Happy New Year! :)
Eliza ♥
am glad it benefited one human @run with fashion. happy new year to u too.
Thank you for posting this. Just what I needed at this moment!
So helpful, thank you so much!
How can things be setup so that a pdf attachment received in an email can be emailed in turn to the blog without downloading to the computer?... for example Minutes of a Public Meeting.
@theszak
Instead of uploading from your computer, do this:
Open the attachment via your email. When attachment is open, save to google drive.
Next go to google drive and look for that saved attachment. Right click on it, select Share. Select advanced and you should be able to modify the rights.
The rest of the steps should be similar.
Thank you so much for this step by step tutorial with pictures. I had read other blogs (with no pictures and not as well described) and could not figure it out. Now I have a nice printable ready for my readers to download! Thanks again!
Thanks a ton Jane..I am new to blogging and have tried many ways to embed my pdf to blogger and none worked properly. But finally i got it right by following your instructions..
thank you thank you! it had been so long since i blogged, everything has changed!
Thank you Thank you!!
THANK YOU VERY MUCH JANE
Thanks so much for this. I did it and it worked.
Thank you for these instructions. It worked like a charm! Now I can actually attach pdf recipe files to my cooking blog entries.
Thank you! I couldn't for the life of me figure out how to do this!
THANKS SO MUCH!!!!!!!!!!
thanks, you really took off the ache from my head
That was great but I wanted more, though I'm not Oliver Twist.
I wanted the PDF to display in the blog instead of clicking on a link and it displays in another window/tab.
zeedon Briggs,
I have added some instructions and pics to show how to display a pdf in a blog post. (Look for "Edited 8th September 2016")
Jane
Thanks!! Works like a charm!
Very helpful and VERY appreciated - thank you!
Fab, thank you so much, this was just what I needed! You're a star. Amy :)
just what I been looking for
if public people can just read it not edit directly in it, right?
but still downloade and then edit?
There are 2 levels of rights. The first level takes place when you create a PDF. You can create a secured PDF or a unsecured PDF. Of course that depends on the software you use for the creation. Does it have the ability?
The second level covered by this tutorial only provides the public or whoever has the links, the ACCESS to the PDF. Do you get the difference?
The readers of your blog - whether they can highlight and copy your contents or add sticky notes or even edit the contents, that's determined by the first level of access as well as the software the readers have. (such as a "edit PDF" software)
So what i'm saying is if you had created a secured PDF, no one can edit your PDF.
I get the point i think
but not sure how i do what... might be that im not english and i mis something in what you say
Thank you so much! this helped me a great deal, this was the most clear tutorial by far!
Thanks to you I was able to upload a free adult coloring drawing at my new blog here is the link to the download if anyone is interested. (Is a handmade drawing that I made not a clipart)
colorchronicles11.blogspot.com
Bless you! Your tutorial is fabulous! Easy to follow, nice screen shots and great explanations! I wish you wrote about everything! Thank you, thank you, and bless you again!
Thank you for writing this! Really easy to follow & I'm going to post my first ever downloadable pdf pattern tomorrow :) Thanks again
Thanks sir
Thanks you just saved a buddy with this explicit explanation.
Three and a half hours I've been trying to get this to work - all sorts of techies and experts have given their instructions. YOUR how-to was the clearest step by step set of instructions and I got there! Thank you so much.
Thank you! You helped me link up my file the first try. I'll link to this post when my blog post is ready.
Thanks.
Very simple and effective.
Thanks
Thanks! I've read these instructions a number of times on various sites, but you were the only one who told me that my blog reader can download the embedded pdf and how they can do that! Thank you!
THANK YOU THANK YOU THANK YOU!!!! This seriously made my day!!! I have seen so many tutorials and didn't understand one until I found yours!!! Thank you so much!!!
There is no longer an "embed" option--what do we do in 2018?! Argh!
Hi Julia,
"embed" option is still there. With your google document open, look for "open in a new window" and click that. Once your document is opened in the new window, click on the 3 vertical dots (more actions) and you will see the embed option.
Cheers,
Jane
tq u so much
Thanks a lot, you solved my problem.
YOU REALLY HELPED - thank you so much! xox
Post a Comment