Wednesday, January 31, 2018

What January Made

Hey folks,

On 2nd Jan this year, inspired by Kim Werker, I decided to make a commitment to make something creative every day. Yes, every day. Throughout 2018. The idea is to post a photo (or two) of what I'm working on on Instagram. There is no creative police to check on me - it is a personal promise I make to myself. I was curious to see what I could create. In the past I made stuff mainly to sell so being profitable and making a quick sale became part of the equation. This time though, I don't have such restrictions.

I think I was quite successful the first 3 and a half weeks of January. I posted a photo on Instagram every day. Even when my physiotherapist broke injured my neck in an attempt to heal me (yup, I fired him), I carried on crafting. I was unstoppable. I explored crafts I wasn't competent in. I revisited old favourite crafts. I had so much fun. I felt so c r e a t i v e. I'll admit though I aimed for quick-to-finish projects. Is that cheating? It's not, right?

The last 5 days or so, I went AWOL. I had a sinus attack. Got sick as a dog. The last thing on my mind was crafting and Instagram.  I was so sick I neglected all housework. Hubs had to learn to operate the washing machine. When we ran out of cups and spoons, my daughter was persuaded to load the dishwasher. Today I'm no longer on my deathbed but the last of the vicious sinus cretins continue to hold on to my nerve points for dear life. I'll recover completely. Eventually. In fact, I have enough energy that I think from tomorrow, I'll be able to jump right back into #yearofmaking2018.

So this is my total haul in January:
I had expected to make more knitted stuff but my injured neck put a halt to my knitting. I don't have any memory muscles for knitting yet so knitting does cause some strain to my shoulders.

Crochet is what I call my cop out craft. When I am dried up and not inspired or panicking (what to make, what to make), I turn to crochet.
Making these bead crochet bracelets reminded me how much I love beads + crochet.

These two were desperate crochet crafts. Then I remembered how much I love crochet balls.
I tried broomstick crochet and discovered I don't like it that much. The lace looks a bit too inelegant for my taste. (no offence to broomstick crochet lovers!)

I made one freestyle embroidered brooch. To be honest, such brooch are difficult (to me) because you don't make any plans and just let inspiration guide you. Sometimes inspiration isn't there for you! I would like to explore more free and easy brooches because they push my boundaries. Of course the chance is high that I'll end up with boring or ugly brooches but I've reached that place where that's ok. We can't be brilliant every day.

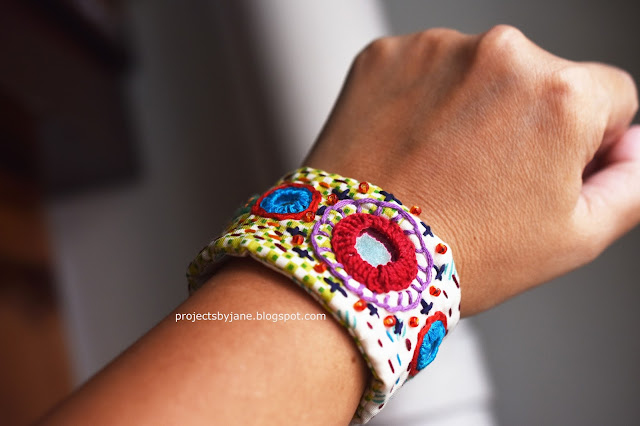
The last thing I completed before falling spectacularly ill was this fabric cuff bracelet. Another exercise in just making it, not planning it. This was tough. Sometimes the freedom to create anything can become a restriction.

I almost forgot. I wrote a tute on how to sew an embroidered fabric brooch.

I have one WIP. This is a lace scarf. I followed a recipe Kate sent me. I can't seem to make much progress on this scarf because I keep ending up with too many or too few stitches. Thus the ripping out over and over again. Hopefully this gets completed in February.

Now that I've gone through 3 and a half weeks of making something creative everyday, I have a better idea for February. I won't chicken out and opt for quick finish projects. Three things I'll keep in mind are: improve my knitting, use my fabric stash and do something different some of the times. I may write one or two tutes (energy permitting) and I know I want to try Bethany's heart. I haven't figured out dpns yet. Just hope I don't stab myself in the eye!

I hope I have excited you enough to do something creative if not everyday, then at least once a week. If you don't wish to follow me on Instagram (why won't you follow me?), but want to follow my progress, you can stalk follow my hashtag instead. That way, you can remain anonymous. ;) I have created a hashtag #projectsbyjane2018 for crafts created in 2018.  Alright then. I'll see you in February.

Friday, January 26, 2018

My First Fabric Cuff Bracelet

It started with these 2 squares of fabric. They have been sitting on my sewing table forever. I hate looking at them so much I decided to make something. After all, reducing my fabric stash has always been on my to-do list year after year.

At first I thought I could make a fabric watch. I cut the fabric into 2 lengthwise, one for the top of the "watch" and one for the bottom. A watch needs a face, right? And I have these Shisha mirrors in my art beads stash. Don't ask me how I have a Shisha mirror stash. (I have everything!) I attached the mirror using chevron stitch. Check out this tute here on chevron stitch on a mirror. It wasn't that easy to sew, let me tell you that.

I wonder if you remember my rule of odd numbers which I rigidly adhered to at my craft markets during the old days? Yup. One mirror is not enough. So three it is. You know sometimes having these  "rules" helps a lot because you don't have to do too much thinking.

After I had attached 3 Shisha mirrors, I was totally dried up creatively. It's interesting to develop something creative organically but honestly, having a plan of some sort helps a lot.

I did the next best thing my brain could summon - try to mimic a watch. I sewed scrap yarn on the fabric to represent the strap. So literal, right?

I brought on some bling.

I deeply regretted the choice of the yellow-green fabric because it's hard to see the embroidery stitches. But remember allllllll these started because of the fabric. I returned to my favourite random running stitches because they are minimalist and I didn't want to clutter up the workspace. After all the embroidery was done, I was feeling very uninspired and wanted to chuck this thing into my #projectsbyjane2018 work-in-progress basket. But I soon fished it out and finished it because I don't want to end up with any UFOs in 2018. (pinky promise) It took no more than 15 minutes to add a layer of batting, sew the top to the front, turn right side out, turn out the corners, slip stich the opening and finally sew on the snaps. Whew! Did I say 15 minutes? Maybe more like 20 minutes. In the end, my fabric watch became a fabric cuff bracelet.


It's not the prettiest thing I've ever made. (not the ugliest either!) Looks kinda weird which suits me because I'm kinda weird too. You know that right? So, what do you think? Yay or nay?

Friday, January 19, 2018

How to sew an embroidered fabric brooch


A few years ago, I casually promised some folks I would write a tutorial on how to sew my fabric brooch. Well, it's a few years later today and I finally got round to it. Better late than never right?

To be honest, I remembered my forgotten promise upon finding some of my unfinished brooches from years gone by when I was peddling my craft at shopping malls.

How To Make A 2" Round Fabric Brooch
Supplies:
  • small amount of fabric
  • small amount of batting
  • paper to print + printer
  • your choice of transfer tool/pen
  • embroidery floss and embroidery needle (the eye should be able to fit 3 to 4 strands of embroidery floss)
  • brooch pin
  • small amount of felt (optional)
  • scissors
1. Download the template here. After downloading, open template using Adobe Reader. There are 3 pages in total. Print the pages you need at 100% or Actual Size.  For page 3 only, print using thicker paper if possible.

2. Choose the desired animal motif and transfer to fabric.
Here are a few transfer methods.
a. Place fabric over printed animal motif template (use actual not reverse). Place against window (or some light source) and trace onto right side of fabric using either a pencil, frixion pen or a water soluble pen. Your choice.

b. Trace motif (use actual not reverse) to fabric using dressmakers carbon paper.

c. Use a transfer pen to trace over animal motif (use reverse not actual) on paper. Place paper (traced side down) on fabric. Iron over paper to do the transfer. You might need to press hard on the iron and go back and forth several times before you get a good transfer.

d. Draw freehand on fabric. Use a pencil, frixion pen or water erasable pen. (this is the method I usually use)

This is my transfer using a transfer pen. I got it smudged because I moved the paper while ironing. I chose the pig which is a drawing by my daughter when she was little.

3. Using 2 to 3 or 4 strands of embroidery floss, sew using backstitch over the outline of the animal motif. The image above shows how I sew backstitch. Some people do it slightly differently. But the end result is the same. For eyes, you can use a single straight stitch or 2 straight stitches (sew like X or +)

p.s. If you aren't into embroidery, use a fabric pen to draw/colour the animal motifs. Place hot iron over your work to set the colour. (protect your iron by placing a hanky over your work) The colour will become slightly muted.

4. Once your embroidery is complete, place the 2.75" template with the dotted line cut out over the embroidery. The hole in the middle helps you to keep your embroidery centered. Draw around the larger circle. Cut fabric exactly on the drawn line.

5a. On right side of embroidery, using regular sewing thread, sew running stitches around the edge of the circle.

b. Place the 2" template with a little hole cut in the middle (for easy removal) on the wrong side of embroidery. Pull the thread tight. You can adjust the position of the template until all is good. Knot off your thread and place hot iron over your brooch front. This will create a crease of the 2" circle. Remove 2" template. Place hot iron over brooch front one more time.

p.s. sometimes I like my brooch front to feel slightly stiffer so what I do is instead of the 2" paper template, I use a 2" stiff fusible interfacing. (grainy side down on wrong side of fabric) After the hot iron is placed over it, it will fuse to the fabric.

6. For the brooch back, create a duplicate of the brooch front, except this time on a plain fabric.

7. I like to add a layer of batting (or felt). If it feels bulky around the edges, cut the batting slightly smaller than the brooch.

8. Sew brooch front to brooch back with layer of batting in between. I use 3 strands of embroidery thread in a colour close to the fabric.

9. Sew brooch pin to the back. Do check placement of embroidery before you sew. Your stitches will definitely show. Don't worry about it. Hide your knots under the pin.

Alternative brooch back
a. Sometimes I prefer to use felt for the back. Use the template for felt backing. It is just a teeny bit smaller than the size of the brooch front. Cut from a sturdy felt. (I used a $2 Daiso felt)

b. Put batting between the front and the felt.

c. Sew felt to front. I usually use a thread that is closer to the colour of the felt. It's ok for the stitches to be visible.

d. Sew brooch pin to back and you're done.

I hope this little tutorial helps you. Please feel free to embellish your brooch in any way you like. Check out this little pig brooch above. I used scraps of felt to give the pig some colour.

This bird brooch above uses a slightly oval shape. Can you believe I cut the shape by hand? Just fold a piece of card stock into four and cut a curve. Your shape may not be perfect but sometimes I think an imperfect shape for a brooch looks more interesting. Have fun!

Tuesday, January 16, 2018

Bead Crochet Bracelets

Last week I made the mistake of opening a cabinet where I keep my beads and stuff. The sight of all the beads which I had bought on top of the beads I had been gifted really gave me some stress. When I was in the hospital to have my gall bladder removed in August 2016, I did wonder (as you do before a surgery) what would happen to all my craft supplies should I either become a vegetable or die. Would my family throw everything away?

After I survived the gall bladder removal, I did make an effort to house keep my family insurance and important documents. But I did nothing about my craft supplies. It would be silly to write a will for my supplies. Firstly, no one would honour such a will. Secondly, who should I will them to? In the end, common sense prevailed and I decided that I'm happy with "I'll be dead, who cares?"

Still, while I'm alive, it's frustrating to see beads sitting in my cabinet. Which is why I keep that cabinet firmly closed most of the time. As I was sifting through my beads, I saw this little packet of glass beads. I think these are Tiba's beads gifted to me a few years ago. There were a total of 28 glass beads and I told myself I bet I could use them all up in a simple bracelet.

A few years ago, I made some anklets using some beads but I didn't want to use the same method as this time I needed to use all 28 glass beads.

In order to use all 28 beads, I strung the beads in pairs using a combination of single crochets(US) and slip stitch. If you are interested to make something similar, I found a youtube video that does more or less what I did. You're probably wondering why I used blood red yarn on the glass beads. I too question my taste but I found the weirdness very appealing. I got very lucky that the 28 beads were just perfect for a bracelet with the help of a toggle clasp (already in my stash). Woo hoo! I can't believe I used up every single glass beads. (by the way, there are plenty more of Tiba's glass beads in different sizes)

I liked the blood red glass bracelet so much that I made another one. This time I used the purple beads. I've had these beads for decades but I've never been able to use them up. There's no way I could use them up but I thought a purple bead crochet bracelet would be nice. I used size 10 Lizbeth purple iris thread. Isn't it gorgeous? One issue I face with bead crochet is matching thread with bead depends a lot on the size of the bead hole. With some beads, it's impossible to thread a thick yarn like size 10. I managed to get lucky with these purple beads and ordinarily I avoid a matchy-matchy look but in this case, I thought the two purple do go together.


I decided I had the enthusiasm for one more bracelet and this time I chose this packet of larger beads. I'm not sure what they are called. Maybe bicones? I could be wrong. These beads are larger (with larger holes) and heavier as well. I chose a size 3 Lizbeth Ocean teal. (size 3 is thicker than size 10) I love this colour to death!

I only had 14 of these beads which means I couldn't do the twin beads method. So I strung them singly in single crochet (US). This method of stringing the beads does mean the beads tend to twist this way or that way. It's no big deal. If you want to make something similar, you can watch this video.  I was very sad I didn't manage to use up all the beads. There were 3 left.

I used a lobster clasp plus a split ring for closure.

The actual amount of time spent making each bracelet is about 10 min if you are familiar with crochet. You'll probably spend extra time matching beads with the yarn.

I'm exceedingly happy with these 3 bracelets. It didn't make much of a dent in my beads supply but I'll probably live a very long life so I have lots of time. The trick is to stop buying beads. Pinky promise. Please tell me which bracelet you like most.
Related Posts with Thumbnails

My Bag Pattern Shop

https://www.etsy.com/shop/projectsbyjane

My Applique Patterns

https://www.etsy.com/shop/projectsbyjane?section_id=15580078&ref=shopsection_leftnav_2

My Embroidery Patterns

https://www.etsy.com/shop/projectsbyjane?section_id=15580078&ref=shopsection_leftnav_2