I'm a Pig!
This is a tutorial to create a simple piggy felt pin and it can be done within an hour. I hope you have fun with it.
What you need:
For pinning : A 2 hole or 3 hole brooch pin or even a safety pin
For sewing : embroidery thread (I used DMC)
Download template:here
Cut out the big circle for the head, the oblong for the snout and the ears. Trace the templates onto felt and cut. The head: Cut 2 pieces of felt. I used light pink for the front and grey for the back. The snout: Cut 1 piece. I used dark pink. The ears: Cut 4 pieces. I used pink polka dot.
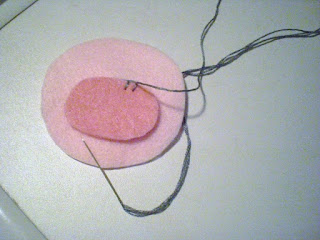
Place the snout on the front of the head and using grey thread attach with blanket stitch. Next, sew the smiling mouth using back stitch. (I used the same grey thread)
Next use black thread to sew the 2 nostrils. I used back stitch to form a circle before filling it with satin stitch. (I forgot to sew the smiling mouth)
I finally did the smiling mouth. The eyes are done in the same fashion as the nostrils in black. Sew the brooch pin onto the back of the head. All knots are hidden on the "wrong" side of the head. The filling of the felt can be done in 2 ways. Either you use a batting or add polyfiber. If you use batting, cut 1 circle of batting slightly smaller than the head. Place it between the wrong side of the heads before the next step. If you are using polyfiber, just carry on.
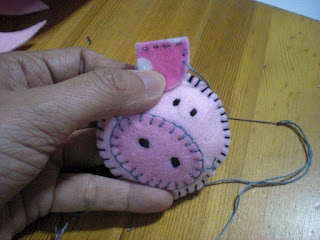
With wrong sides together, sew the front of head to the back of head using blanket stitch. I used black thread. If you used batting, sew all the way through. Ignore the next step.
If you are using polyfiber, stop sewing 3/4 through to put in the polyfiber.

Place 2 pieces of ear felt wrong sides together and sew using running stitch. I used grey thread because it matches the back. Sew through all layers for the parts where the ear touches the head. This will anchor the ear to the head. Do the same for the other ear.
This is what you should get.
View from the back
Below are some felt pins I made. I hope they inspire you.
* * *
Below are my bag patterns which are available for sale at Etsy (instant download). Clicking on the images will take you to my Etsy shop.
For more Applique Resources
For more Tutorials


9 comments:
Thank you so much for this tutorial!
u're welcome Jenny. hope to see what u make!
never knew making this thing was that easy..thanks a lot!
Oh please won't you link this up at my weekly party that runs every friday afternoon until monday night. I love it and if you check out my blog you will see why. A friend from Sew Much 2 Luv actually sent me to see this. I would love to feature it on one of my feature fridays.
BTW following you now with GFC.
PS, it's my birthday week and I have a pretty big give away going on now at SomedayCrafts.
http://www.bacontimewiththehungryhypo.blogspot.com/
Hope to see you soon
Adorable pig!
Love this post! Hope you'll link it and any other kid or teen related posts that you have to our "Crafts for Under Twenty Somethings" party tomorrow!
Melanie
bearrabbitbear.blogspot.com
I LOVE working with felt in this way, and these are just tooo cute! I am so glad you shared! I've made many monsters by hand with felt, so the pins are new for me! Thanks again!
This is so cute. I love pigs. I found you through the Handmade Artist Forum. Had to come check out the pig pin tutorial. Love it! Thanks for sharing.
Linda
oh how cute, my mum loves pigs and she'd love this!
Post a Comment